Adding a new user field
The most common question we get on the UserFrosting issues page is "how can I add another user field?" For this tutorial, we will assume that you simply want to create a new field for users that will show up on the registration page, and that can be made visible to administrators when they view the users' details. Please make sure you understand how this basic process works before attempting to make more complicated extensions. To make more advanced changes, you must take the time to read through the code to understand the different components and how they interact.
Step 1: Add a new column to the users table
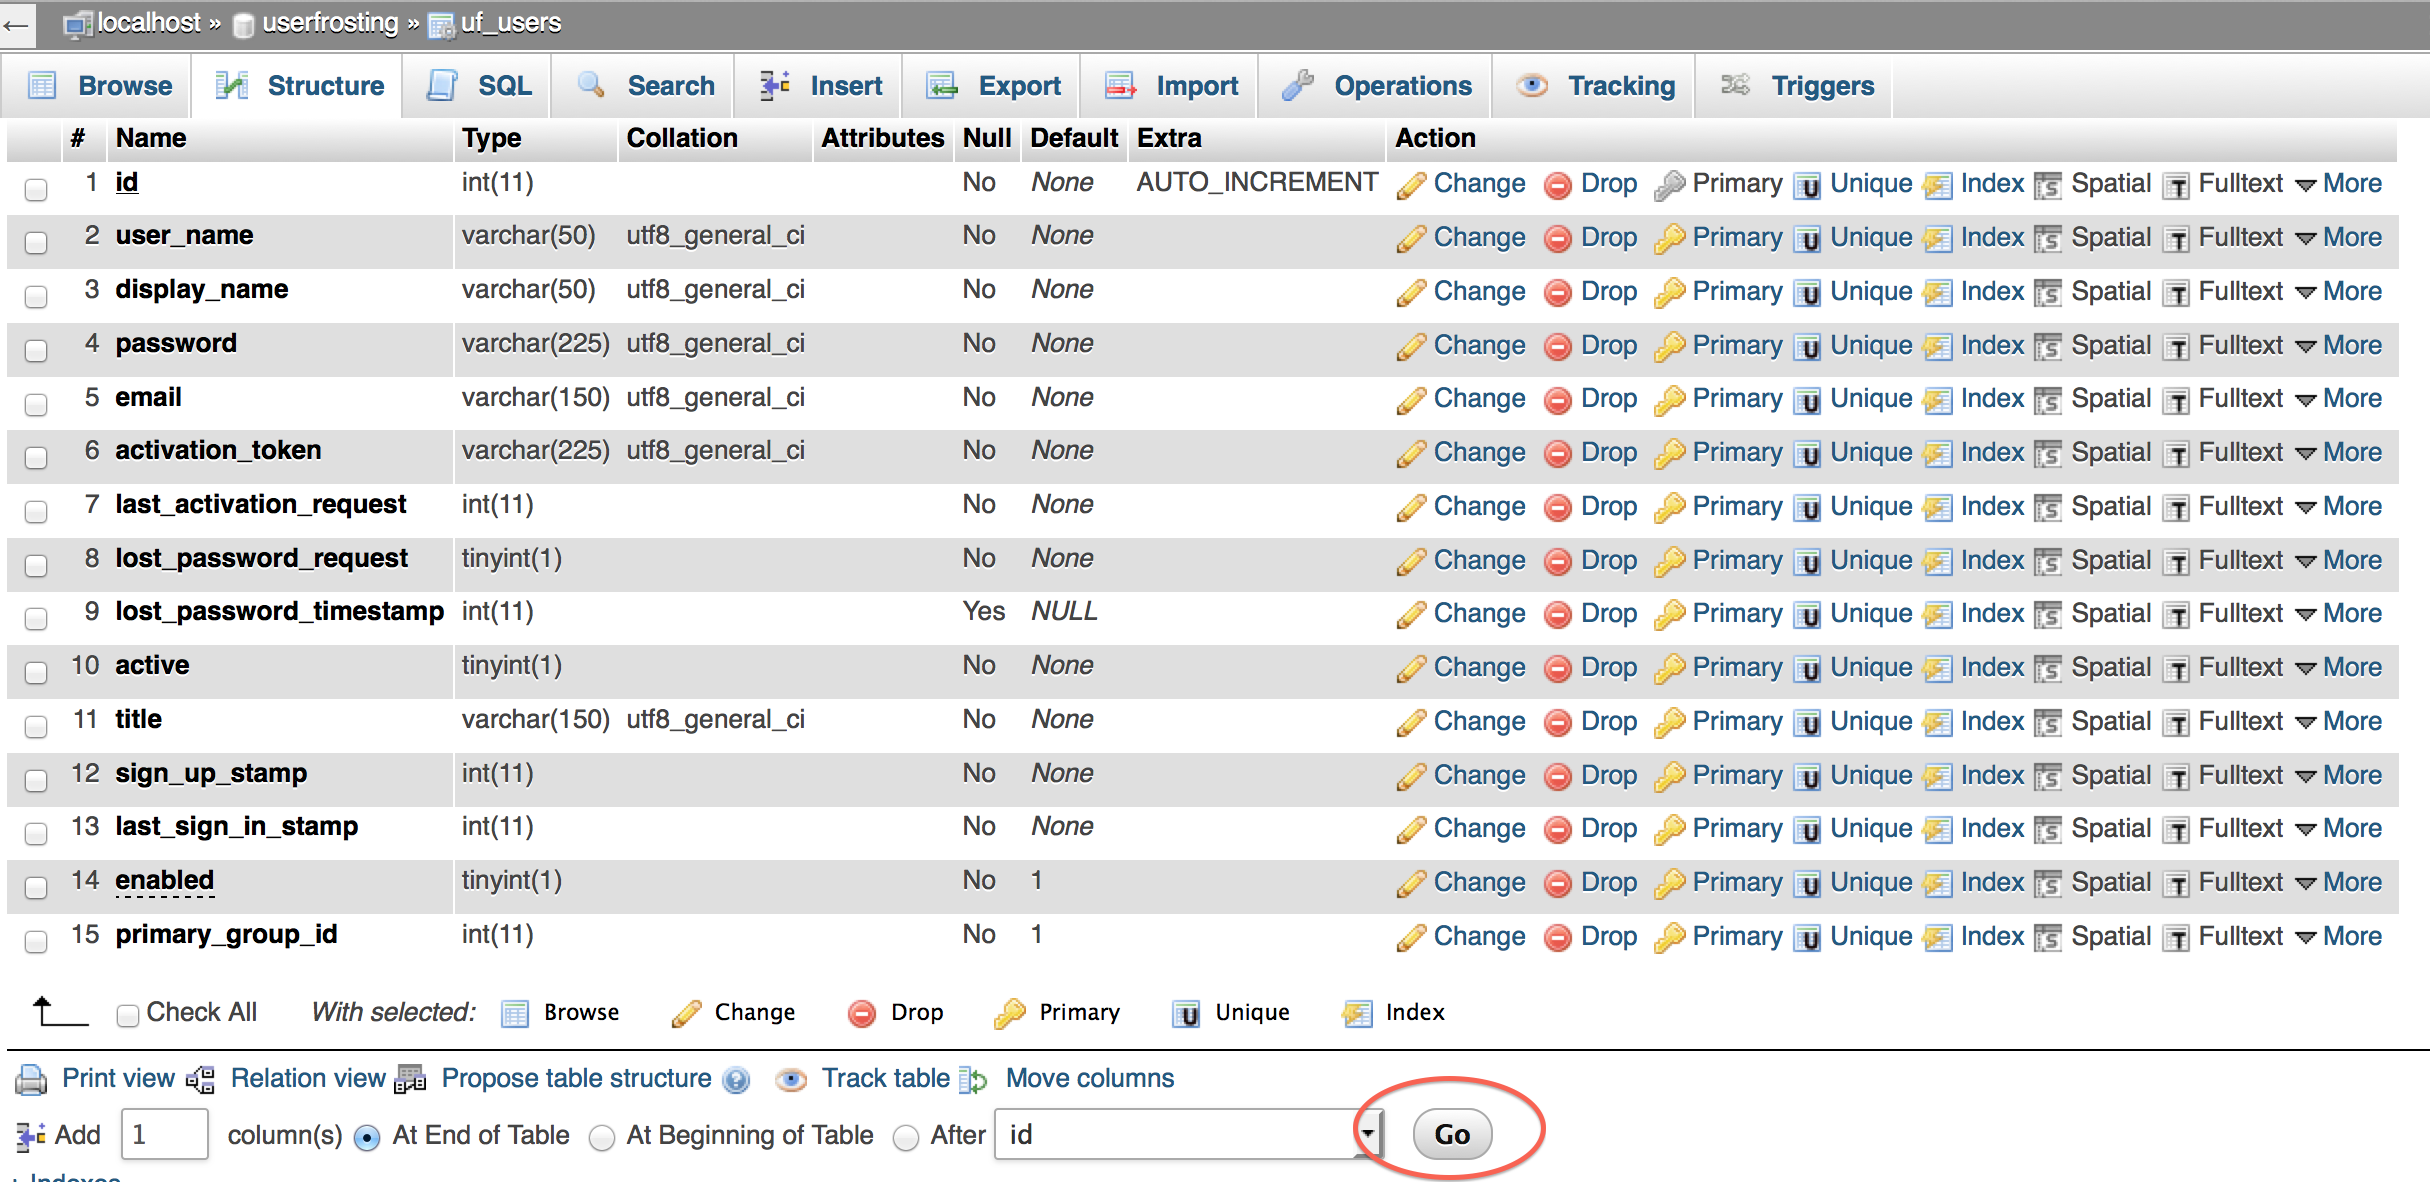
First, you will need to add a new column to the users table. If you are using phpmyadmin, this is done by going to (your database name here)->uf_users->structure, and clicking "Go" at the bottom:
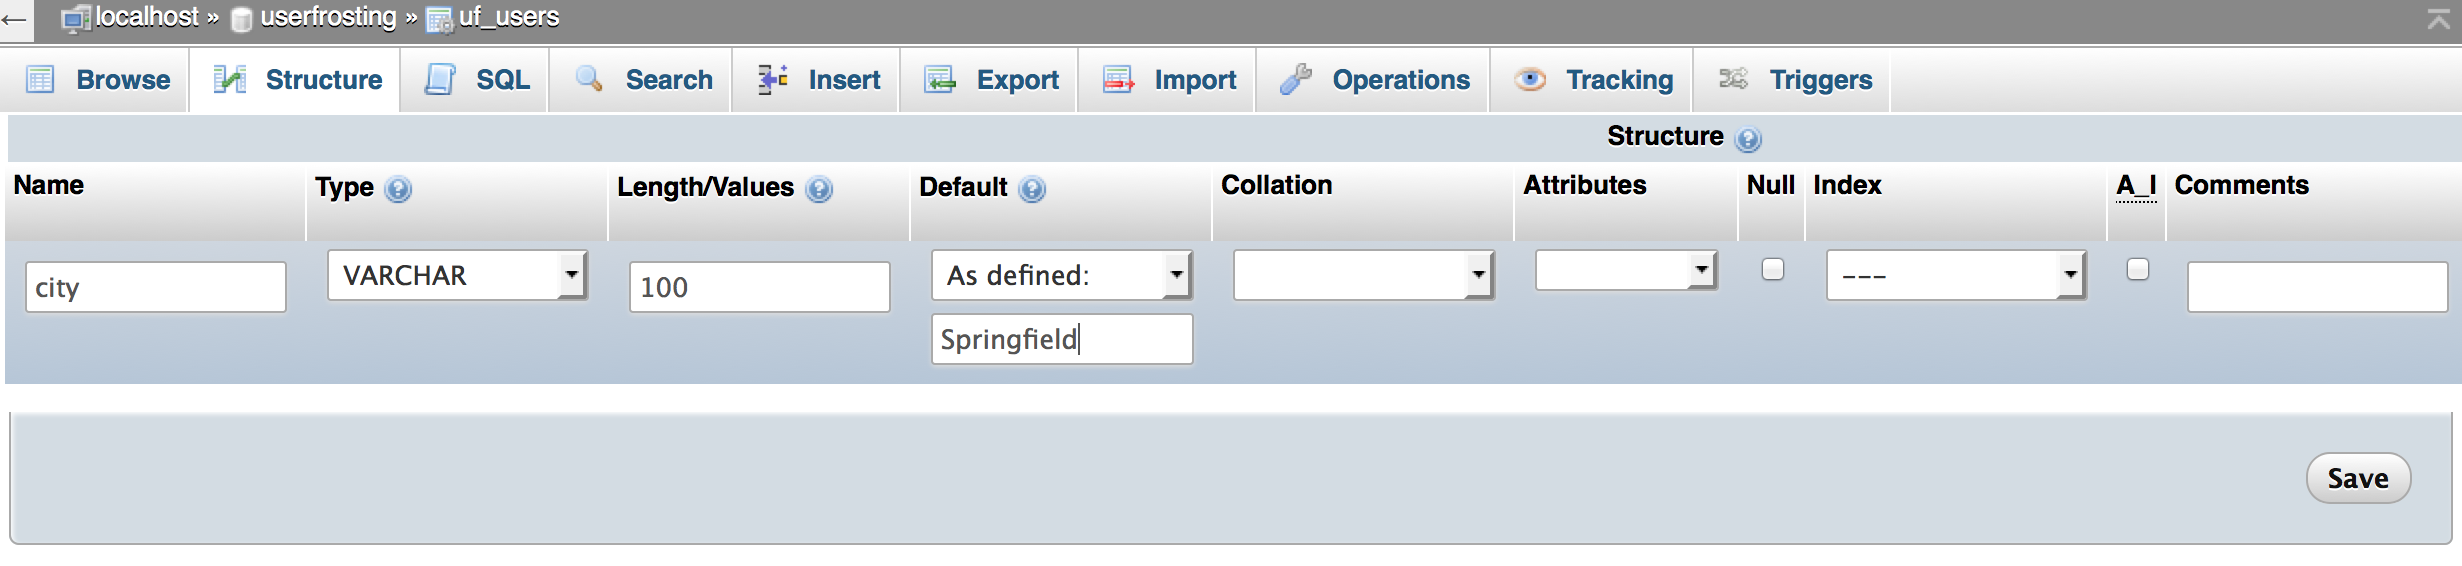
It will then allow you to add a new field. Let us suppose we want a simple text field with the name city. We will make this a variable of type varchar, which is essentially a string variable, with a maximum length of 100. You may, of course, create int, date, and other types of variables as well. Give the field a default value - "Springfield", and click "Save":
For other SQL clients, please consult their documentation on altering the structure of a table. You can also add new columns by directly running a SQL command, please see the MySQL documentation for details.
Step 2: Add the field to the CRUD functions
Next, we need to tell UF how to interact with this new database column. There are four basic types of interactions, known as CRUD - Create, Read, Update, Delete. There are of course, other ways to operate on database information as well, but these are the simplest and most common operations. To do this, we will modify the file models/db_functions.php. In future iterations of UserFrosting, we hope to make this functionality automatic when you add a new column to the database, but for now it must be done manually.
Create
First, let's tell UF how to insert the new field into the database when a new user is created. This is done in the function addUser (please find this in your db_functions.php). You'll want to add your new field as a parameter, and then add it to the query. The changes you need to make are in bold:
// Add a user to the database
function addUser($user_name, $display_name, $title, $password, $email, $active, $activation_token, $city)
{
    try {
        global $db_table_prefix;

        $db = pdoConnect();

        $query = "INSERT INTO ".$db_table_prefix."users (
            user_name,
            display_name,
            password,
            email,
            activation_token,
            city,
            last_activation_request,
            lost_password_request,
            lost_password_timestamp,
            active,
            title,
            sign_up_stamp,
            last_sign_in_stamp
            )
            VALUES (
            :user_name,
            :display_name,
            :password,
            :email,
            :activation_token,
            :city,
            '".time()."',
            '0',
            '".time()."',
            :active,
            :title,
            '".time()."',
            '0'
        )";

        $sqlVars = array(
            ':user_name' => $user_name,
            ':display_name' => $display_name,
            ':title' => $title,
            ':password' => $password,
            ':email' => $email,
            ':active' => $active,
            ':activation_token' => $activation_token,
            ':city' => $city
        );

        $stmt = $db->prepare($query);

        if (!$stmt->execute($sqlVars)) {
            // Error: column does not exist
            return false;
        }

        $inserted_id = $db->lastInsertId();

        $stmt = null;

        return $inserted_id;

    } catch (PDOException $e) {
        addAlert("danger", "Oops, looks like our database encountered an error.");
        error_log("Error in " . $e->getFile() . " on line " . $e->getLine() . ": " . $e->getMessage());
        return false;
    } catch (ErrorException $e) {
        addAlert("danger", "Oops, looks like our server might have goofed.  If you're an admin, please check the PHP error logs.");
        return false;
    }
}
Make sure you check for correct usage of commas, etc. Notice that we use a placeholder in the query, and then use PDO to prepare the query with the $sqlVars array. It is extremely important to do this, instead of directly interpolating the variables in the query. Interpolating variables directly in your query leaves you open to SQL injection attacks.
Read
Next, we will tell UF how to load the new field when it loads information for a new user. This is done in the functions fetchUser, fetchAllUsers, fetchGroupUsers, and fetchUserAuth. You will want to make the following changes (in bold):
fetchAllUsers
function fetchAllUsers($limit = null)
{
    try {
        global $db_table_prefix;

        $results = array();

        $db = pdoConnect();

        $sqlVars = array();

        $query = "select {$db_table_prefix}users.id as user_id, user_name, display_name, email, title, sign_up_stamp,
        last_sign_in_stamp, active, enabled, primary_group_id, city from {$db_table_prefix}users";

        $stmt = $db->prepare($query);
        $stmt->execute($sqlVars);

        if (!$limit) {
            $limit = 9999999;
        }

        $i = 0;
        while ($r = $stmt->fetch(PDO::FETCH_ASSOC) and $i < $limit) {
            $id = $r['user_id'];
            $results[$id] = $r;
            $i++;
        }

        $stmt = null;
        return $results;

    } catch (PDOException $e) {
        addAlert("danger", "Oops, looks like our database encountered an error.");
        error_log("Error in " . $e->getFile() . " on line " . $e->getLine() . ": " . $e->getMessage());
        return false;
    } catch (ErrorException $e) {
        addAlert("danger", "Oops, looks like our server might have goofed.  If you're an admin, please check the PHP error logs.");
        return false;
    }
}
fetchUser
function fetchUser($user_id)
{
    try {
        global $db_table_prefix;

        $results = array();

        $db = pdoConnect();

        $sqlVars = array();

        $query = "select {$db_table_prefix}users.id as user_id, user_name, display_name, email, title, sign_up_stamp,
        last_sign_in_stamp, active, enabled, primary_group_id, city from {$db_table_prefix}users where {$db_table_prefix}users.id = :user_id";

        $sqlVars[':user_id'] = $user_id;

        $stmt = $db->prepare($query);
        $stmt->execute($sqlVars);

        if (!($results = $stmt->fetch(PDO::FETCH_ASSOC))){
            addAlert("danger", "Invalid user id specified");
            return false;
        }

        $stmt = null;

        return $results;

    } catch (PDOException $e) {
        addAlert("danger", "Oops, looks like our database encountered an error.");
        error_log("Error in " . $e->getFile() . " on line " . $e->getLine() . ": " . $e->getMessage());
        return false;
    } catch (ErrorException $e) {
        addAlert("danger", "Oops, looks like our server might have goofed.  If you're an admin, please check the PHP error logs.");
        return false;
    }
}
fetchUserAuth
function fetchUserAuth($column, $data)
{
    try {
        global $db_table_prefix;

        $results = array();

        $db = pdoConnect();

        $sqlVars = array();

        $query = "SELECT
            id,
            user_name,
            display_name,
            password,
            email,
            activation_token,
            last_activation_request,
            lost_password_request,
            lost_password_timestamp,
            active,
            title,
            sign_up_stamp,
            last_sign_in_stamp,
            enabled,
            primary_group_id,
            city
            FROM ".$db_table_prefix."users
            WHERE
            $column = :data
            LIMIT 1";

        $stmt = $db->prepare($query);

        $sqlVars[':data'] = $data;

        $stmt->execute($sqlVars);

        if (!($results = $stmt->fetch(PDO::FETCH_ASSOC))) {
            // The user does not exist
            return false;
        }

        $stmt = null;
        return $results;

    } catch (PDOException $e) {
        addAlert("danger", "Oops, looks like our database encountered an error.");
        error_log("Error in " . $e->getFile() . " on line " . $e->getLine() . ": " . $e->getMessage());
        return false;
    } catch (ErrorException $e) {
        addAlert("danger", "Oops, looks like our server might have goofed.  If you're an admin, please check the PHP error logs.");
        return false;
    } catch (RuntimeException $e) {
        addAlert("danger", "Oops, looks like our server might have goofed.  If you're an admin, please check the PHP error logs.");
        error_log("Error in " . $e->getFile() . " on line " . $e->getLine() . ": " . $e->getMessage());
        return false;
    }
}
fetchGroupUsers
// Fetch user information for a specified group
function fetchGroupUsers($group_id)
{
    try {
        global $db_table_prefix;

        $results = array();

        $db = pdoConnect();

        $sqlVars = array();

        $query = "SELECT {$db_table_prefix}users.id as user_id, user_name, display_name, email, title, sign_up_stamp,
            last_sign_in_stamp, active, enabled, primary_group_id, city
            FROM ".$db_table_prefix."user_group_matches,".$db_table_prefix."users
            WHERE group_id = :group_id and ".$db_table_prefix."user_group_matches.user_id = ".$db_table_prefix."users.id
            ";

        $stmt = $db->prepare($query);

        $sqlVars[':group_id'] = $group_id;

        if (!$stmt->execute($sqlVars)) {
            // Error
            return false;
        }

        while ($r = $stmt->fetch(PDO::FETCH_ASSOC)) {
            $id = $r['user_id'];
            $results[$id] = $r;
        }
        $stmt = null;

        return $results;

    } catch (PDOException $e) {
        addAlert("danger", "Oops, looks like our database encountered an error.");
        error_log("Error in " . $e->getFile() . " on line " . $e->getLine() . ": " . $e->getMessage());
        return false;
    } catch (ErrorException $e) {
        addAlert("danger", "Oops, looks like our server might have goofed.  If you're an admin, please check the PHP error logs.");
        return false;
    }
}
Update and Delete
Userfrosting uses the generic functions updateUserField and deleteUser to perform update and delete operations. So, we don't need to modify any code for that.
Step 3: Add the field to the secure functions
UserFrosting uses a separate functional layer to control authorization. The functions in db_functions.php allow you to perform basic DB operations, but by themselves, they do not control who is allowed to perform those operations. To provide access control, we must modify the functions in models/secure_functions.php. In this case, we only need to modify the createUser function, and add a new function to update your new field. Please find the createUser function and make the following modifications (in bold):
createUser
function createUser($user_name, $display_name, $email, $city, $title, $password, $passwordc, $require_activation, $admin)
{
    // if we're in admin mode, then the user must be logged in and have appropriate permissions
    if ($admin == "true") {
        // This block automatically checks this action against the permissions database before running.
        if (!checkActionPermissionSelf(__FUNCTION__, func_get_args())) {
            addAlert("danger", "Sorry, you do not have permission to access this resource.");
            return false;
        }
    }

    $error_count = 0;

    // Check values
    if (minMaxRange(1,25,$user_name)) {
        addAlert("danger", lang("ACCOUNT_USER_CHAR_LIMIT",array(1,25)));
        $error_count++;
    }

    if (!ctype_alnum($user_name)) {
        addAlert("danger", lang("ACCOUNT_USER_INVALID_CHARACTERS"));
        $error_count++;
    }

    if (minMaxRange(1,50,$display_name)) {
        addAlert("danger", lang("ACCOUNT_DISPLAY_CHAR_LIMIT",array(1,50)));
        $error_count++;
    }

    if (!isValidName($display_name)) {
        addAlert("danger", lang("ACCOUNT_DISPLAY_INVALID_CHARACTERS"));
        $error_count++;
    }

    if (!isValidEmail($email)) {
        addAlert("danger", lang("ACCOUNT_INVALID_EMAIL"));
        $error_count++;
    }

    if (minMaxRange(1,100,$city)) {
        addAlert("danger", "City must be between 1 and 100 characters long!");
        $error_count++;
    }

    if (minMaxRange(1,150,$title)) {
        addAlert("danger", lang("ACCOUNT_TITLE_CHAR_LIMIT",array(1,150)));
        $error_count++;
    }

    if (minMaxRange(8,50,$password) && minMaxRange(8,50,$passwordc)) {
        addAlert("danger", lang("ACCOUNT_PASS_CHAR_LIMIT",array(8,50)));
        $error_count++;
    } elseif ($password != $passwordc) {
        addAlert("danger", lang("ACCOUNT_PASS_MISMATCH"));
        $error_count++;
    }

    if (usernameExists($user_name)) {
        addAlert("danger", lang("ACCOUNT_USERNAME_IN_USE",array($user_name)));
        $error_count++;
    }

    if (displayNameExists($display_name)) {
        addAlert("danger", lang("ACCOUNT_DISPLAYNAME_IN_USE",array($display_name)));
        $error_count++;
    }

    if (emailExists($email)) {
        addAlert("danger", lang("ACCOUNT_EMAIL_IN_USE",array($email)));
        $error_count++;
    }

    //Construct a secure hash for the plain text password
    $password_hash = passwordHashUF($password);
    if ($password_hash === null) {
        addAlert("danger", lang("PASSWORD_HASH_FAILED"));
        $error_count++;
    }

    // Exit on any invalid parameters
    if ($error_count != 0)
        return false;

    //Construct a unique activation token (even if activation is not required)
    $activation_token = generateActivationToken();
    $active = 1;

    //Do we need to require that the user activate their account first?
    if ($require_activation) {

        //User must activate their account first
        $active = 0;

        $mailSender = new userCakeMail();

        //Build the activation message
        $activation_message = lang("ACCOUNT_ACTIVATION_MESSAGE",array(SITE_ROOT . "api/", $activation_token));

        //Define more if you want to build larger structures
        $hooks = array(
            "searchStrs" => array("#ACTIVATION-MESSAGE","#ACTIVATION-KEY","#USERNAME#"),
            "subjectStrs" => array($activation_message,$activation_token,$display_name)
        );

        /* Build the template - Optional, you can just use the sendMail function
        Instead to pass a message. */
        // If there is a mail failure, fatal error
        if (!$mailSender->newTemplateMsg("new-registration.txt",$hooks)) {
            addAlert("danger", lang("MAIL_ERROR"));
            return false;
        } else {
            //Send the mail. Specify users email here and subject.
            //SendMail can have a third paremeter for message if you do not wish to build a template.
            if(!$mailSender->sendMail($email, "Please activate your account")) {
                addAlert("danger", lang("MAIL_ERROR"));
                return false;
            }
        }
    }

    // Insert the user into the database and return the new user's id
    return addUser($user_name, $display_name, $title, $password_hash, $email, $active, $activation_token, $city);
}
Notice that we first add the new field as a parameter to createUser, then create a validation check, then finally pass the new field into the addUser CRUD function at the bottom. The validation we have provided is just an example - you can make other rules such as checking that the city is in a list of pre-approved cities, etc. Validation functions are currently found in models/funcs.php.
Next, we will create an update function for the new field. This will allow you to provide fine-grained control over who is allowed to modify this particular field. In secure_functions.php, create a new function, updateUserCity:
function updateUserCity($user_id, $city)
{
    // This block automatically checks this action against the permissions database before running.
    if (!checkActionPermissionSelf(__FUNCTION__, func_get_args())) {
        addAlert("danger", "Sorry, you do not have permission to access this resource.");
        return false;
    }

    //Validate city
    if (minMaxRange(1,100,$city)) {
        addAlert("danger", "City must be between 1 and 100 characters long!");
        return false;
    }

    if (updateUserField($user_id, 'city', $city)) {
        addAlert("success", "City updated successfully.");
        return true;
    } else {
        return false;
    }
}
Notice that we again validate the field, before updating it with the updateUserField function.
You will probably also want to grant certain users/groups the ability to run this new function. To do this, please log in as the root user, and go to "Site Settings -> Authorization". There, you can grant access to the new updateUserCity function to individual users, or entire groups.
Great! At this point, we've finished implementing the heavy machinery for our new field. Next, we will work our new field into the API for creating and updating users.
Step 4: Add the field to the API pages
The pages in api/ are the primary access point where the frontend (tables, forms, etc) interacts with the backend (database, authorization, and validation layers). For our new city field, we will need to modify api/create_user.php and api/update_user.php. Again, modifications are in bold:
create_user.php
The main lines to worry about here are approximately lines 79-137:
$user_name = str_normalize($validator->requiredPostVar('user_name'));
$display_name = trim($validator->requiredPostVar('display_name'));
$email = str_normalize($validator->requiredPostVar('email'));
$city = str_normalize($validator->requiredPostVar('city'));

// If we're in admin mode, require title.  Otherwise, use the default title
if ($admin == "true") {
  $title = trim($validator->requiredPostVar('title'));
} else {
  $title = $new_user_title;
}

// Don't trim passwords
$password = $validator->requiredPostVar('password');
$passwordc = $validator->requiredPostVar('passwordc');

// Requires admin mode and appropriate permits
$add_groups = $validator->optionalPostVar('add_groups');
$skip_activation = $validator->optionalPostVar('skip_activation');
$primary_group_id = $validator->optionalPostVar('primary_group_id');

// Required for non-admin mode
$captcha = $validator->optionalPostVar('captcha');
$spiderbro = $validator->optionalPostVar('spiderbro');

// Add alerts for any failed input validation
foreach ($validator->errors as $error) {
  addAlert("danger", $error);
}

$error_count = count($validator->errors);

// Check captcha and honeypot if not in admin mode
if ($admin != "true") {
    if (!$captcha || md5($captcha) != $_SESSION['captcha']) {
        addAlert("danger", lang("CAPTCHA_FAIL"));
        $error_count++;
    }

    // Check the honeypot. 'spiderbro' is not a real field, it is hidden on the main page and must be submitted with its default value for this to be processed.
    if ($spiderbro != "http://") {
        error_log("Possible spam received:" . print_r($_POST, true));
        addAlert("danger", "Aww hellllls no!");
        $error_count++;
    }
}

if ($error_count == 0) {
    global $emailActivation;

    // Use the global email activation setting unless we're told to skip it
    if ($admin == "true" && $skip_activation == "true")
        $require_activation = false;
    else
        $require_activation = $emailActivation;

    // Try to create the new user
    if ($new_user_id = createUser($user_name, $display_name, $email, $city, $title, $password, $passwordc, $require_activation, $admin)) {

    } else {
        apiReturnError($ajax, ($admin == "true") ? ACCOUNT_ROOT : SITE_ROOT);
    }
Notice that we've declared the new field as a required POST variable. So, we are saying that the city field MUST be specified when a new user is created. You can use the optionalPostVar function if you want UF to automatically set the value to null if it is not specified.
update_user.php
For updating a user, we don't want to require that the city field be specified every time. After all, what if we just want to update some other field? So here, we will use the optionalPostVar function:
lines 41-58
$validator = new Validator();
// Required: csrf_token, user_id
$csrf_token = $validator->requiredPostVar('csrf_token');
$user_id = $validator->requiredNumericPostVar('user_id');

$display_name = trim($validator->optionalPostVar('display_name'));
$email = str_normalize($validator->optionalPostVar('email'));
$city = str_normalize($validator->optionalPostVar('city'));
$title = trim($validator->optionalPostVar('title'));

$rm_groups = $validator->optionalPostVar('remove_groups');
$add_groups = $validator->optionalPostVar('add_groups');
$enabled = $validator->optionalPostVar('enabled');
$primary_group_id = $validator->optionalPostVar('primary_group_id');

// For updating passwords.  The user's current password must also be included (passwordcheck) if they are resetting their own password.
$password = $validator->optionalPostVar('password');
$passwordc = $validator->optionalPostVar('passwordc');
$passwordcheck = $validator->optionalPostVar('passwordcheck');
insert after line 100
//Update city if specified and different from current value
if ($city && $userdetails['city'] != $city) {
    if (!updateUserCity($user_id, $city)) {
        $error_count++;
    } else {
        $success_count++;
    }
}
This basically tells UF to only try to update the city if it is specified, and different from the current value.
Cool, now UF knows how to accept the new field from the outside world. Next, let's start playing with the frontend code, and work our new field into the registration process as well as the backend administrative interface.
Step 5: Add the field to the registration page
Now that you have created the field in the database, let us see if we can make it possible for users to specify the field when they register. To do this, we will modify register.php. UserFrosting uses the Bootsole templating system to render forms. This allows you to quickly add fields without mucking around a lot with the HTML.
For complete information on the different types of fields that you can add, please see the Bootsole readme. Please note that UF still uses Bootsole v0.1.1, so not all field types are currently available. For now, let us assume we want to add a simple text field. To do this, we must add the appropriate metadata for the new field to the $fields array:
Starting at line 61:
$fields = [
    'user_name' => [
        'type' => 'text',
        'label' => 'Username',
        'validator' => [
            'minLength' => 1,
            'maxLength' => 25,
            'label' => 'Username'
        ],
        'placeholder' => 'Please enter the user name'
    ],
    'display_name' => [
        'type' => 'text',
        'label' => 'Display Name',
        'validator' => [
            'minLength' => 1,
            'maxLength' => 50,
            'label' => 'Display name'
        ],
        'placeholder' => 'Please enter the display name'
    ],
    'email' => [
        'type' => 'text',
        'label' => 'Email',
        'icon' => 'fa fa-envelope',
        'validator' => [
            'minLength' => 1,
            'maxLength' => 150,
            'email' => true,
            'label' => 'Email'
        ],
        'placeholder' => 'Email goes here'
    ],
    'password' => [
        'type' => 'password',
        'label' => 'Password',
        'icon' => 'fa fa-key',
        'validator' => [
            'minLength' => 8,
            'maxLength' => 50,
            'label' => 'Password',
            'passwordMatch' => 'passwordc'
        ]
    ],
    'passwordc' => [
        'type' => 'password',
        'label' => 'Confirm password',
        'icon' => 'fa fa-key',
        'validator' => [
            'minLength' => 8,
            'maxLength' => 50,
            'label' => 'Password'
        ]
    ],
    'captcha' => [
        'type' => 'text',
        'label' => 'Confirm Security Code',
        'icon' => 'fa fa-eye',
        'validator' => [
            'minLength' => 1,
            'maxLength' => 50,
            'label' => 'Security code'
        ]
    ],
    'city' => [
        'type' => 'text',
        'label' => 'City',
        'icon' => 'fa fa-map-marker',
        'validator' => [
            'minLength' => 1,
            'maxLength' => 100,
            'label' => 'City'
        ],
        'placeholder' => 'Please enter the city'
    ]
];
Notice that we have specified that this is a text field by using the 'type' => 'text' property, and given it the label "City". This label will appear next to the field in the registration form. We have also given it an icon from the FontAwesome icon catalog, and specified a client-side validator. The client-side validator lets UF validate the field before the form is even submitted, in the client's browser. This is for user convenience only! Someone could still find a way to POST invalid data to the API page, which is why we had to validate the new field on the server side as well.
We will also tell UF where to place the new field in the template. To do this, modify the template (starting on line 129):
$template = "
<form name='newUser' class='form-horizontal' id='newUser' role='form' action='api/create_user.php' method='post'>
  <div class='row'>
    <div id='display-alerts' class='col-lg-12'>

    </div>
  </div>
  <div class='row'>
    <div class='col-sm-12'>
        {{user_name}}
    </div>
  </div>
  <div class='row'>
    <div class='col-sm-12'>
        {{display_name}}
    </div>
  </div>
  <div class='row'>
    <div class='col-sm-12'>
        {{email}}
    </div>
  </div>

  <!-- New user field - city -->
  <div class='row'>
    <div class='col-sm-12'>
        {{city}}
    </div>
  </div>

  <div class='row'>
    <div class='col-sm-12'>
        {{password}}
    </div>
  </div>
  <div class='row'>
    <div class='col-sm-12'>
        {{passwordc}}
    </div>
  </div>
  <div class='row'>
    <div class='col-sm-12'>
        {{captcha}}
    </div>
  </div>
  <div class='form-group'>
    <div class='col-sm-12'>
        <img src='$captcha' id='captcha'>
    </div>
  </div>
  <br>
  <div class='form-group'>
    <div class='col-sm-12'>
      <button type='submit' class='btn btn-success submit' value='Register'>Register</button>
    </div>
  </div>
  <div class='collapse'>
    <label>Spiderbro: Don't change me bro, I'm tryin'a catch some flies!</label>
    <input name='spiderbro' id='spiderbro' value='http://'/>
  </div>
</form>";
This lets you control where the field will appear in the form. I've placed it right after the email field, but of course you may place it wherever you like. The FormBuilder class will automatically use the information you specified in $fields, along with the template, to generate the form on the fly.
Great, now your new field is added to the registration form. Try it out by registering a new account, and ensure that the new field is correctly inserted into the database.
Step 6: Add the field to the user management form
That does it for the registration page, but what about managing the field on the backend? To do this, we will modify the file forms/form_user.php. Like register.php, this page uses the FormBuilder templating system. We will basically make the same modifications, except this time we will add a display attribute to the field, with the value disabled:
'city' => [
    'type' => 'text',
    'label' => 'City',
    'icon' => 'fa fa-map-marker',
    'display' => 'disabled',
    'validator' => [
        'minLength' => 1,
        'maxLength' => 100,
        'label' => 'City'
    ],
    'placeholder' => 'Please enter the city'
]
We also need to add the field to the template, starting on line 294:
$template .= "
<div class='dialog-alert'>
</div>
<div class='row'>
    <div class='col-sm-6'>
        {{user_name}}
    </div>
    <div class='col-sm-6'>
        {{display_name}}
    </div>
</div>
<div class='row'>
    <div class='col-sm-6'>
        {{email}}
    </div>
    <div class='col-sm-6'>
        {{title}}
    </div>
</div>

<!-- new field -->
<div class='row'>
    <div class='col-sm-12'>
        {{city}}
    </div>
</div>

<div class='row'>
    <div class='col-sm-6'>
        {{last_sign_in_stamp}}
    </div>
    <div class='col-sm-6'>
        {{sign_up_stamp}}
    </div>
</div>
<div class='row'>
    <div class='col-sm-6'>
        {{password}}
        {{passwordc}}
    </div>";
Again, you can style the field as you see fit.
These are just the default settings for the field, and by default we want the user form to be read-only. Thus, we use the 'display' => 'disabled' attribute. This means that the field will be read-only unless specified otherwise, such as when it is loaded in account/user_details.php. However, we still want to be able to modify the field when we click 'Edit user', so we will need to override this default value when we open the form in editable mode. To do this, we will modify js/widget-users.js:
Starting on line 126 of widget-user.js:
var data = {
    box_id: box_id,
    render_mode: 'modal',
    ajaxMode: "true",
    fields: {
        'user_name' : {
            'display' : 'show'
        },
        'display_name' : {
            'display' : 'show'
        },
        'email' : {
            'display' : 'show'
        },
        'city' : {
            'display' : 'show'
        },
        'title' : {
            'display' : 'show'
        },
        'last_sign_in_stamp' : {
            'display': 'disabled',
            'preprocess' : 'formatSignInDate'
        },
        'sign_up_stamp' : {
            'display': 'disabled',
            'preprocess' : 'formatSignInDate'
        },
        'password' : {
            'display' : 'show'
        },
        'passwordc' : {
            'display' : 'show'
        },
        'groups' : {
            'display' : 'show'
        }
    },
This tells us that, when the javascript function userForm is called, that it should render the city field in editable mode. Ok, you should now be able to see/modify the field from the admin side!
Step 7 (optional): Add the field to the user management table
You may also want to see the user's city in the table on the 'Users' page. If so, we will need to modify the forms/table_users.php page. UF uses the TableBuilder templating class to build tables. The data and templating information for tables is specified in the columns variable:
$v->setDefault('columns',
    [
    'user_info' =>  [
        'label' => 'User/Info',
        'sort' => 'asc',
        'sorter' => 'metatext',
        'sort_field' => 'user_name',
        'template' => "
            <div class='h4'>
                <a href='user_details.php?id={{user_id}}'>{{display_name}} ({{user_name}})</a>
            </div>
            <div>
                <i>{{title}}</i>
            </div>
            <div>
                <i class='fa fa-envelope'></i> <a href='mailto:{{email}}'>{{email}}</a>
            </div>"
    ],
    'user_since' => [
        'label' => 'Registered Since',
        'sorter' => 'metanum',
        'sort_field' => 'sign_up_stamp',
        'template' => "
            {{sign_up_day}}<br>
            {{sign_up_date}} {{sign_up_time}}"
    ],
    'user_sign_in' => [
        'label' => 'Last Sign-in',
        'sorter' => 'metanum',
        'sort_field' => 'last_sign_in_stamp',
        'template' => "
            {{last_sign_in_day}}<br>
            {{last_sign_in_date}} {{last_sign_in_time}}",
        'empty_field' => 'last_sign_in_stamp',
        'empty_value' => '0',
        'empty_template' => "<i>Brand new</i>"
    ]

]);
We can either add the city to an existing column in the table, such as the user_info column, by using an appropriately named placeholder in the template field of that column: {{city}}. This will tell UF to insert the city field in this column.
Alternatively, we can specify a new column:
    'city' => [
        'label' => 'City',
        'template' => "
            {{city}}"
    ],
This will tell UF to print the city in its own column, with the header labeled as "City". You can specify other attributes for the column, please see the Bootsole readme for more details.
Conclusion
We have demonstrated how to add a new field for users. At the moment it is a long process, but we hope to create a simple, schema-driven solution in future versions of UF. In the mean time, this is a good place for you to start learning how the various components of UF work and interact with each other. Enjoy!